So, armed with a bunch of photos, we go to work. Lea has mentioned a few key points that she would like me to work on, and I will address those points over the next few days. Lea has also mentioned to me that we really need to be budget minded, and we also need to consider the very real possibility that this property will be one that they will rent out in the foreseeable future.
The main points that Lea mentioned were a kitchen renovation, fireplace rehab, paint color selection, and painting of wood paneling in certain rooms.
Today we are going to tackle the fireplace.
Here is the fireplace as it currently stands:
The perspective in this photograph is a bit deceptive. It makes the hearth look very deep, but based on other photos, and based on the assumption that the existing tiles are 4x4, then the depth of the hearth is approximately 12 inches.
While we have a few different options for treating the fireplace, they all include getting rid of the shelf that is currently serving as a mantel. It has got to go. And luckily, that appears like it should be a really easy first step.
Scenario #1 - The easiest and most cost effective idea for this fireplace is to remove the existing terra cotta colored tiles and retile with a neutral travertine mosaic like this,
In this scenario, you would paint the drywall surround the same color you are going to paint the wall, and hang a large piece of art above the fireplace. Easy and done. The tricky thing with trying to add a mantel in this scenario is that because of the way the whole fireplace unit extends into the room, any mantle would have to either die at the ends (which would create a blunt end on the front of the fireplace and look odd) or it would need to wrap around the sides (which I will address further down).
Scenario #2- Ideally I would like to either eliminate or change the existing hearth. This is really going to depend on factors that we do not currently have the answers to. I am hoping that you will be able to remove the carpeting in this room and find lovely hardwood floors underneath, like those that run through the rest of the house. That would be great. Assuming that is the case, you would be able to see how the hearth was built, either on top of the floor or within it. How the hearth was constructed will determine how easy it is to remove. If it can be removed, then I would suggest running the mosaic around the fireplace opening, sides (6"), top (6") and bottom (taking it all the way to where it meets the floor in the bottom), then creating a new flat hearth from 1 row of 12x12 travertine tiles that extends from one edge of the fireplace surround to the other. This would be flush with the floor.
If the construction of the existing hearth is such that it is not easily removed, another option is to add on to the sides of the existing hearth (using what ever type of material the hearth is made of, wood, cement block, etc). You would extend both sides of the hearth so that it is as wide as the whole fireplace build out. Then you would cover the hearth with travertine tile.
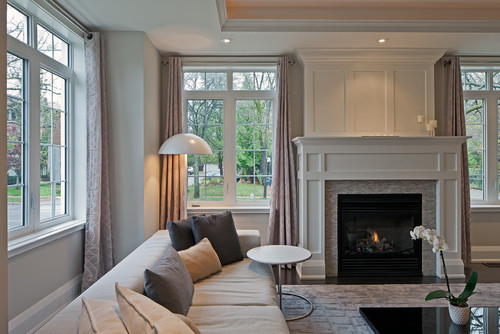
So this leads me to Scenario 3, my ideal scenario. Once you have determined the revamped hearth, tiled it with travertine and surrounded the fire box with travertine mosaic, a bit more work and some minor carpentry know how can get you an end result that looks something like this:
Contemporary Living Room by Toronto Photographers Peter A. Sellar - Architectural Photographer
I know that it may look daunting, but this is mainly just straight cuts with flat stock MDF. Depending on how crafty you are feeling, this is really something that can be done, or can be a relatively easy project for a carpenter or handyman. To make it even easier, you can use a piece like this premade mantel cap shelf for the mantel piece. Just be sure to miter it at the corners and wrap it around the sides of the fireplace like is done in the photo above.
I hope that this gives you plenty to think on. I will be back tomorrow with another post on some of the other points we discussed.


No comments:
Post a Comment